
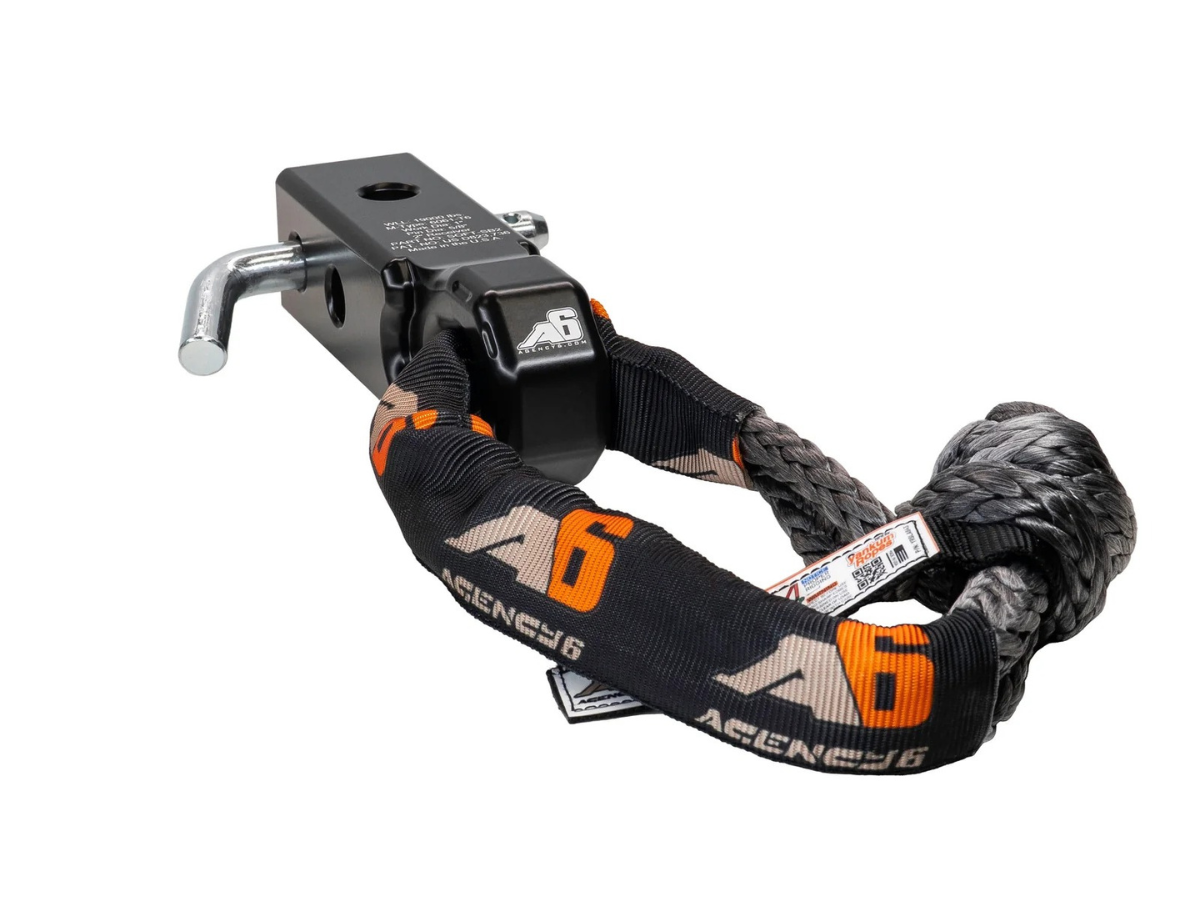
A properly installed Agency 6 shackle block is a critical component of any safe and effective vehicle recovery system. During off-road travel, overlanding, or professional recovery situations, help manage load direction, reduce stress on recovery points, and protect essential equipment from unnecessary wear. When installed incorrectly or paired with incompatible hardware, however, recovery performance can suffer and safety risks increase.
This guide walks through everything needed to install, inspect, and maintain correctly. Each section is designed to eliminate confusion, reduce misuse, and improve confidence during recovery operations. Clear installation steps, safety checks, and optimization tips ensure Agency 6 performs reliably in real-world conditions.
Required Tools
Preparation is one of the most overlooked steps in recovery equipment installation. Having the correct tools and inspecting mounting points beforehand helps prevent alignment issues, hardware damage, and unsafe recovery setups. Using quality components from Recovery Kits ensures compatibility with your shackle block and other recovery gear, giving you a safer and more reliable system overall.
-
Begin with basic hand tools. A torque wrench is essential to ensure fasteners are tightened to proper specifications. Over-tightening can damage threads or deform components, while under-tightening can allow movement under load. A socket set, hex keys, or Torx bits may be needed depending on the recovery point design.
-
Protective gloves are strongly recommended. Recovery hardware is often heavy, and sharp edges or burrs may be present. Gloves also improve grip when tightening shackles or positioning the shackle block.
-
Before installation, inspect the vehicle’s recovery point. It must be a rated recovery point designed to handle vehicle loads. Look for cracks, deformation, rust, or loose mounting bolts. Clean the mounting surface thoroughly to remove dirt, mud, or corrosion. A clean, flat surface ensures the shackle block sits flush and distributes force evenly.
-
Confirm hardware compatibility. The shackle block is designed to work with rated shackles, straps, and recovery points. All components should share compatible load ratings. Never mix recovery-rated hardware with decorative or transport-only tie-down points.
Spending a few extra minutes on preparation significantly reduces installation errors and improves recovery safety.
Step-by-Step Installation
Installing shackle blocks collection correctly ensures controlled load direction and minimizes stress on the vehicle and recovery equipment.
Follow each step carefully before placing the system under load:
-
Park and Secure the Vehicle - Start by parking the vehicle on level, stable ground. Engage the parking brake and use wheel chocks if available. Stability is critical when working around recovery points and heavy hardware.
-
Locate the Designated Recovery Point - Identify a reinforced recovery point mounted directly to the vehicle frame or a structural recovery mount. Never attach shackle blocks to bumpers, hitch accessories not rated for recovery, or sheet metal mounts.
-
Position the Shackle Block - Slide the shackle block into the recovery point opening. The block should fit smoothly without force. If resistance is encountered, stop and inspect for debris, misalignment, or incompatible hardware. Forcing the block can cause improper seating and uneven load distribution.
-
Insert the Shackle Pin or Connecting Hardware - Insert the pin through the shackle block and thread it by hand first to ensure clean engagement. Cross-threading can permanently damage the hardware and compromise safety.
-
Torque the Pin to Specification - After hand-tightening, use a torque wrench to secure the pin to the manufacturer’s recommended specification. Do not overtighten proper torque allows secure retention while permitting controlled movement under load.
-
Attach Recovery Line - Pass the recovery strap, rope, or winch line through the shackle block. Ensure the line aligns straight through the block without rubbing against edges, mounts, or vehicle components. Proper alignment reduces abrasion and prolongs strap life.
-
Perform Final Visual Check - Confirm the shackle block sits flush, hardware is fully seated, and the recovery line moves freely. Only after completing these checks should recovery operations begin.
Safety Checks
Even a correctly installed shackle block must be inspected before every recovery. Off-road conditions introduce dirt, vibration, and shock loads that can affect hardware over time. Following routine inspections ensures both safety and reliable performance, especially when paired with the gear in the Billet Winch Shackles guide.
Follow these safety checks:
-
Visual Inspection of Shackle Block: Look for cracks, deformation, gouges, or excessive wear. Remove any damaged components from service immediately.
-
Check Shackles and Pins: Inspect for bending, thread damage, or misalignment. Pins should seat fully and rotate smoothly without binding. Verify safety clips or retention mechanisms are present if applicable.
-
Verify Load Ratings: Ensure all components shackle block, shackles, recovery straps, and vehicle recovery points meet or exceed the expected recovery load. The system is only as strong as its weakest component.
-
Inspect Recovery Straps and Ropes: Check for fraying, cuts, or melted fibers. Ensure alignment and prevent sharp contact points that accelerate wear. Replace damaged straps before use.
-
Clear the Recovery Area: Keep bystanders at a safe distance and use recovery dampers where appropriate. Apply load gradually to reduce shock on all components.
Routine safety checks significantly reduce the risk of accidents and equipment failure during recovery operations.
Maintenance Tips
Proper maintenance ensures shackle blocks remain reliable across repeated recovery scenarios and harsh environments.
Follow these steps:
-
Clean After Each Use: Rinse the shackle block with fresh water to remove mud, sand, salt, and debris that can cause abrasion or corrosion. Dry thoroughly, paying special attention to threads and contact surfaces.
-
Inspect for Wear: Regularly examine the block for wear patterns. Light surface marks are normal, but deep gouges, cracks, or deformation indicate the block should be retired from service.
-
Check Threaded Components: Inspect pins and other threaded hardware for galling or corrosion. Apply a light anti-seize compound if recommended to ensure smooth installation and removal in the future.
-
Store Properly: Keep shackle blocks in a dry, secure location away from loose cargo. Avoid impact damage during transport, which is a common cause of premature failure.
-
Routine Care: Consistently perform these maintenance steps to protect your investment and ensure the shackle block performs safely and reliably when it matters most.
Frequently Asked Question
1. What is an Agency 6 shackle block?
It’s a recovery component that manages load direction, protects gear, and ensures safe off-road recoveries.
2. What tools are needed for installation?
A torque wrench, compatible sockets or hex keys, and protective gloves are essential.
3. How often should I inspect it?
Check before every recovery for cracks, wear, fraying, or damaged threads.
4. Can I mount it anywhere?
Only use reinforced, rated recovery points, never bumpers or sheet metal.
5. How do I maintain it?
Clean after use, inspect for wear, lubricate threads if needed, and store in a dry, secure spot.

Install Once, Recover with Confidence
Correct installation and care of an Agency 6 shackle block and related directly impacts recovery safety, performance, and equipment longevity. Following proper installation steps, performing routine safety checks, and maintaining all hardware reduces misuse and prevents unnecessary returns.
Shackle blocks are precision recovery components designed for demanding off-road conditions. When installed correctly and paired with compatible recovery gear from Agency 6, they provide controlled load management, smoother operation, and dependable performance in real-world recovery scenarios.